Import your project from GitHub to GitLab
Import your projects from GitHub to GitLab with minimal effort.
Overview
Note: If you are an administrator you can enable the GitHub integration in your GitLab instance sitewide. This configuration is optional, users will still be able to import their GitHub repositories with a personal access token.
Note: Administrators of a GitLab instance (Community or Enterprise Edition) can also use the GitHub rake task to import projects from GitHub without the constrains of a Sidekiq worker.
- At its current state, GitHub importer can import:
- the repository description (GitLab 7.7+)
- the Git repository data (GitLab 7.7+)
- the issues (GitLab 7.7+)
- the pull requests (GitLab 8.4+)
- the wiki pages (GitLab 8.4+)
- the milestones (GitLab 8.7+)
- the labels (GitLab 8.7+)
- the release note descriptions (GitLab 8.12+)
- the pull request review comments (GitLab 10.2+)
- the regular issue and pull request comments
- References to pull requests and issues are preserved (GitLab 8.7+)
- Repository public access is retained. If a repository is private in GitHub it will be created as private in GitLab as well.
How it works
When issues/pull requests are being imported, the GitHub importer tries to find the GitHub author/assignee in GitLab's database using the GitHub ID. For this to work, the GitHub author/assignee should have signed in beforehand in GitLab and associated their GitHub account. If the user is not found in GitLab's database, the project creator (most of the times the current user that started the import process) is set as the author, but a reference on the issue about the original GitHub author is kept.
The importer will create any new namespaces (groups) if they don't exist or in the case the namespace is taken, the repository will be imported under the user's namespace that started the import process.
The importer will also import branches on forks of projects related to open pull requests. These branches will be imported with a naming scheme similar to GH-SHA-Username/Pull-Request-number/fork-name/branch. This may lead to a discrepancy in branches compared to the GitHub Repository.
For a more technical description and an overview of the architecture you can refer to Working with the GitHub importer.
Importing your GitHub repositories
The importer page is visible when you create a new project.

Click on the GitHub link and the import authorization process will start. There are two ways to authorize access to your GitHub repositories:
- Using the GitHub integration (if it's enabled by your GitLab administrator). This is the preferred way as it's possible to preserve the GitHub authors/assignees. Read more in the How it works section.
- Using a personal access token provided by GitHub.
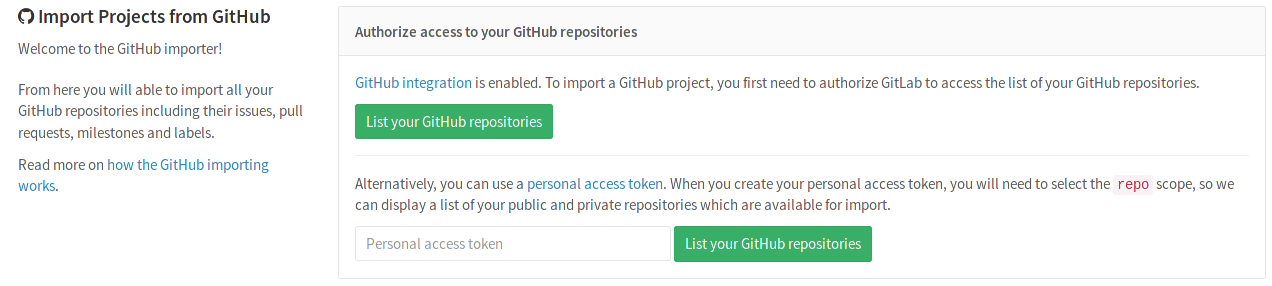
Authorize access to your repositories using the GitHub integration
If the GitHub integration is enabled by your GitLab administrator, you can use it instead of the personal access token.
- First you may want to connect your GitHub account to GitLab in order for the username mapping to be correct.
- Once you connect GitHub, click the List your GitHub repositories button and you will be redirected to GitHub for permission to access your projects.
- After accepting, you'll be automatically redirected to the importer.
You can now go on and select which repositories to import.
Authorize access to your repositories using a personal access token
Note: For a proper author/assignee mapping for issues and pull requests, the GitHub integration should be used instead of the personal access token. If the GitHub integration is enabled by your GitLab administrator, it should be the preferred method to import your repositories. Read more in the How it works section.
If you are not using the GitHub integration, you can still perform a one-off authorization with GitHub to grant GitLab access your repositories:
- Go to https://github.com/settings/tokens/new.
- Enter a token description.
- Check the
reposcope. - Click Generate token.
- Copy the token hash.
- Go back to GitLab and provide the token to the GitHub importer.
- Hit the List Your GitHub Repositories button and wait while GitLab reads your repositories' information. Once done, you'll be taken to the importer page to select the repositories to import.
Select which repositories to import
After you've authorized access to your GitHub repositories, you will be redirected to the GitHub importer page.
From there, you can see the import statuses of your GitHub repositories.
- Those that are being imported will show a started status,
- those already successfully imported will be green with a done status,
- whereas those that are not yet imported will have an Import button on the right side of the table.
If you want, you can import all your GitHub projects in one go by hitting Import all projects in the upper left corner.
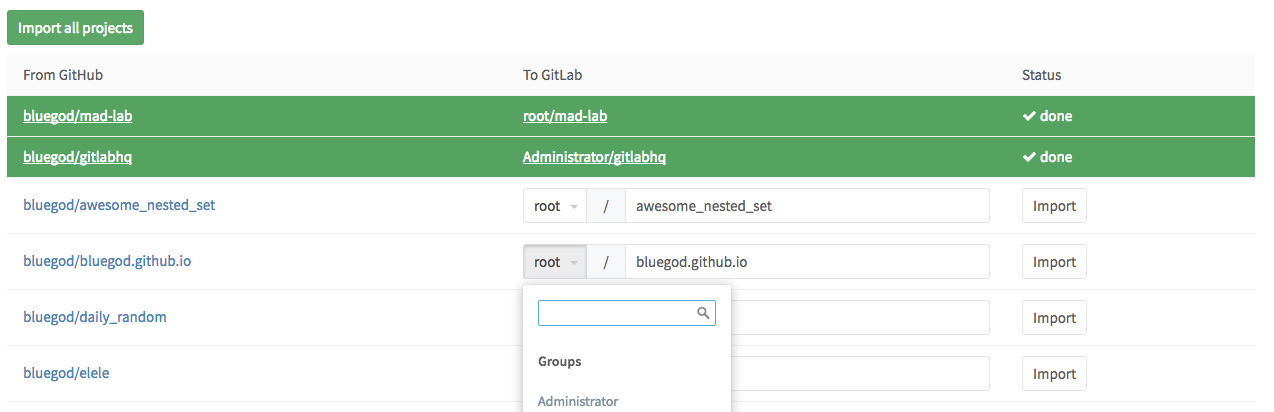
You can also choose a different name for the project and a different namespace, if you have the privileges to do so.
Making the import process go faster
For large projects it may take a while to import all data. To reduce the time necessary you can increase the number of Sidekiq workers that process the following queues:
github_importergithub_importer_advance_stage
For an optimal experience we recommend having at least 4 Sidekiq processes (each running a number of threads equal to the number of CPU cores) that only process these queues. We also recommend that these processes run on separate servers. For 4 servers with 8 cores this means you can import up to 32 objects (e.g. issues) in parallel.
Reducing the time spent in cloning a repository can be done by increasing network throughput, CPU capacity, and disk performance (e.g. by using high performance SSDs) of the disks that store the Git repositories (for your GitLab instance). Increasing the number of Sidekiq workers will not reduce the time spent cloning repositories.